Inline Metafields
Edit product metafields in place, right on the product page, without leaving it.
This guide covers installing Inline Metafields, using it, and managing your subscription.
Before you start
You will need:
- A BigCommerce store, with permission to install apps.
Install the app
- Open Inline Metafields in the BigCommerce App Marketplace.
- Click Install.
- Review the permissions. Inline Metafields asks to manage App Extensions, which adds its item to your product menus, and to modify Products, which it needs to read a product and save your fields on it. It doesn’t ask for access to your orders or customers.
- Click Confirm.
The app appears under Apps → My Apps in your control panel, and opens automatically once installed.
Capture: the BigCommerce install confirmation for the dev app on the sandbox, with the permissions list fully visible, just before Confirm is clicked.
Start your free trial
The first time you open Inline Metafields you’ll see a subscription screen with a 7-day free trial. Click Start Free Trial and you’ll be taken to Stripe to enter payment details.
You are not charged during the trial. If you cancel before it ends, you pay nothing. After the trial, Inline Metafields costs USD 9.99/month, plus applicable tax, and renews monthly until you cancel.
Stripe opens in the full browser window rather than inside the BigCommerce panel. That’s expected — payment pages cannot be displayed inside another site’s frame. When you finish, use the link Stripe shows to return to your control panel.
Capture: the app's first screen on a store with no subscription: the 7-day free trial box, the price line and the Start Free Trial button, inside the control panel.
Using the app
Inline Metafields adds your own fields to every product, such as a material, care instructions or a launch date. You set up each field once, and then fill it in on each product from the product list, the product page or the app itself. For changes across many products, use a CSV file.
The values you enter are saved on your products in BigCommerce as metafields. Your theme can show them on the storefront, and you can keep any field private.
Set up your fields
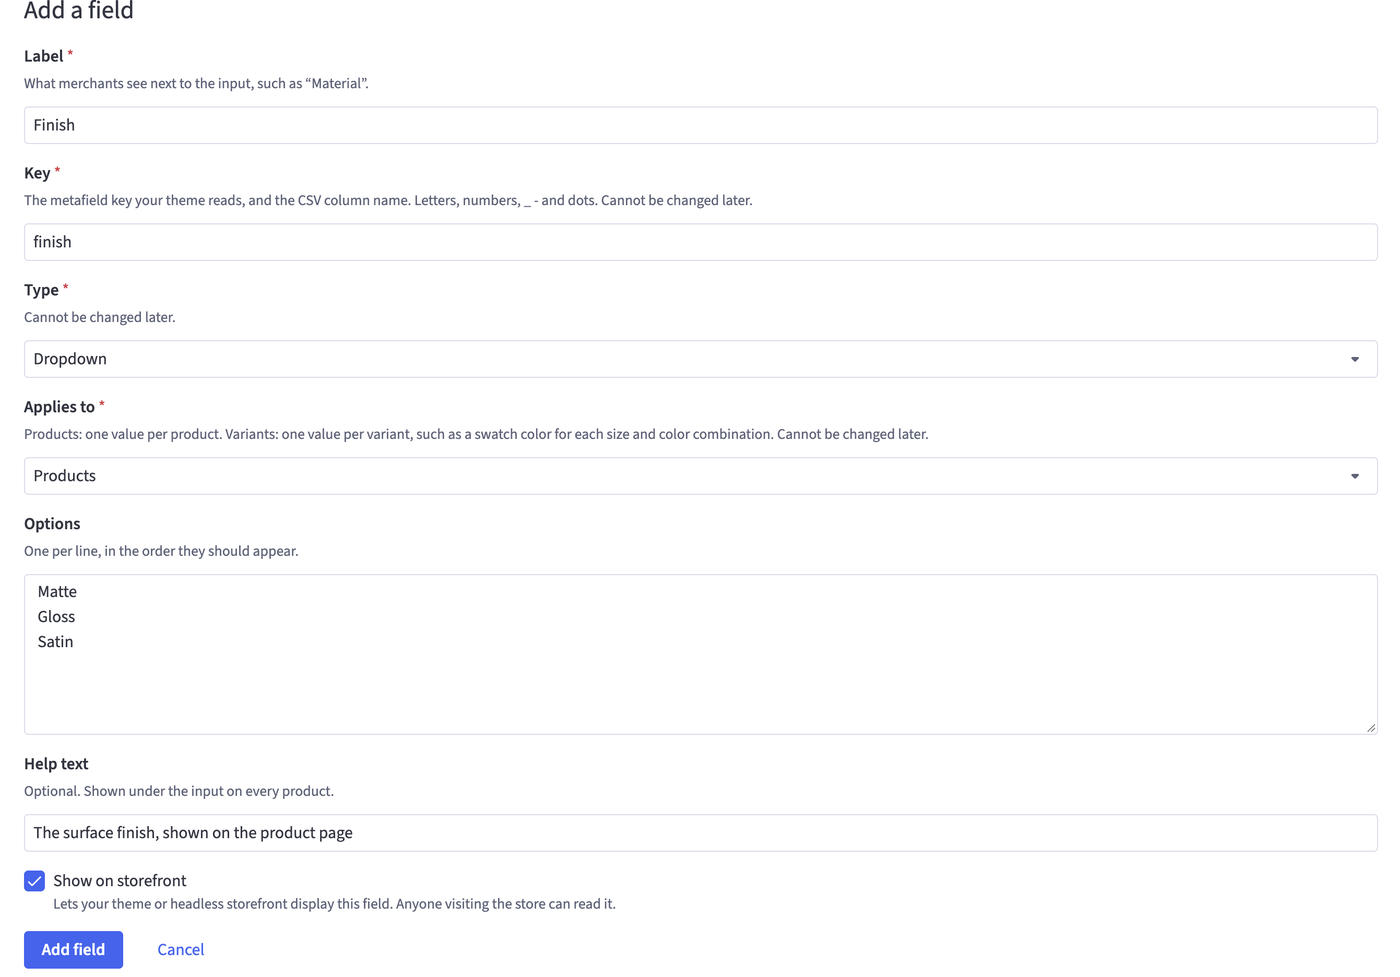
Open the app from Apps → My Apps → Inline Metafields and choose the Fields tab. As an example, here is how to add a dropdown called Materials with three choices:
- Click Add field.
- For Label, enter Materials. This is the name you’ll see on each product. The Key fills in as
materials; it’s the name your theme uses to find the value and the column name in a CSV file. - For Type, choose Dropdown.
- Under Options, enter one choice per line: Leather, Vinyl and Plastic. They appear in this order.
- Optionally, add Help text, such as “What the outer shell is made of”. It’s shown under the field on every product.
- Leave Show on storefront on (see below), and click Add field.
Each type has its own input on the product, and its own rules:
| Type | For | Rules you can set |
|---|---|---|
| Single-line text | A short piece of text on one line | Minimum and maximum length |
| Multi-line text | Longer text, such as care instructions | Minimum and maximum length |
| Number | A number, such as a weight or a thread count | Whole numbers only, minimum, maximum |
| Dropdown | One choice from a list | The options, one per line |
| Multi-select | Any number of choices from a list | The options, and the fewest and most choices allowed |
| Yes / no | Yes, no or not set | None |
| Date | A calendar date | Earliest and latest date |
| Rich text | Formatted text: bold, italic, lists and links | None. Other formatting is removed when it’s saved |
| Color | A color, such as a swatch, picked or typed as hex (#1A2B3C) | None |
| Link (URL) | A web address, such as a spec sheet or a care guide | None. Links must start with https:// |
| Media link | An image, a video or a file, shown as a preview on the product | Image, video or file |
| Product reference | Other products in your store, such as related products or a matching item | One product, or several (up to 50) |
A value that breaks a field’s rules is refused with a message saying why, so a typo such as “Leathr” can’t be saved.
- A field’s key and type can’t be changed after you add it. Everything else can: click Edit next to the field. To change the type, delete the field and add it again with the same key.
- Changing a field never changes products that already have a value. If you rename or remove the option “Vinyl”, products set to Vinyl keep it, and the product shows a warning until someone picks a new value.
- Deleting a field doesn’t delete the values already saved on products. They stay on the product and move to the Custom metafields section.
- Applies to sets whether a field has one value per product (the default) or one value per variant, such as a swatch color for each size and color. Like the key and type, it can’t be changed after you add the field.
- Use Move up and Move down to set the order fields appear in on each product and in a CSV file.
- You can add up to 100 fields, each dropdown or multi-select with up to 100 options.
Show on storefront. New fields are on by default, so your theme or headless storefront can read them, and so can anyone visiting your store. For internal details, such as supplier codes or cost notes, turn Show on storefront off to keep the field private. To show fields to shoppers, drag the Product Fields widget onto your product page in Page Builder, with no theme code; see Showing your fields on the storefront.
Fill in fields on a product
You can open a product’s fields from three places. They all show the same editor.
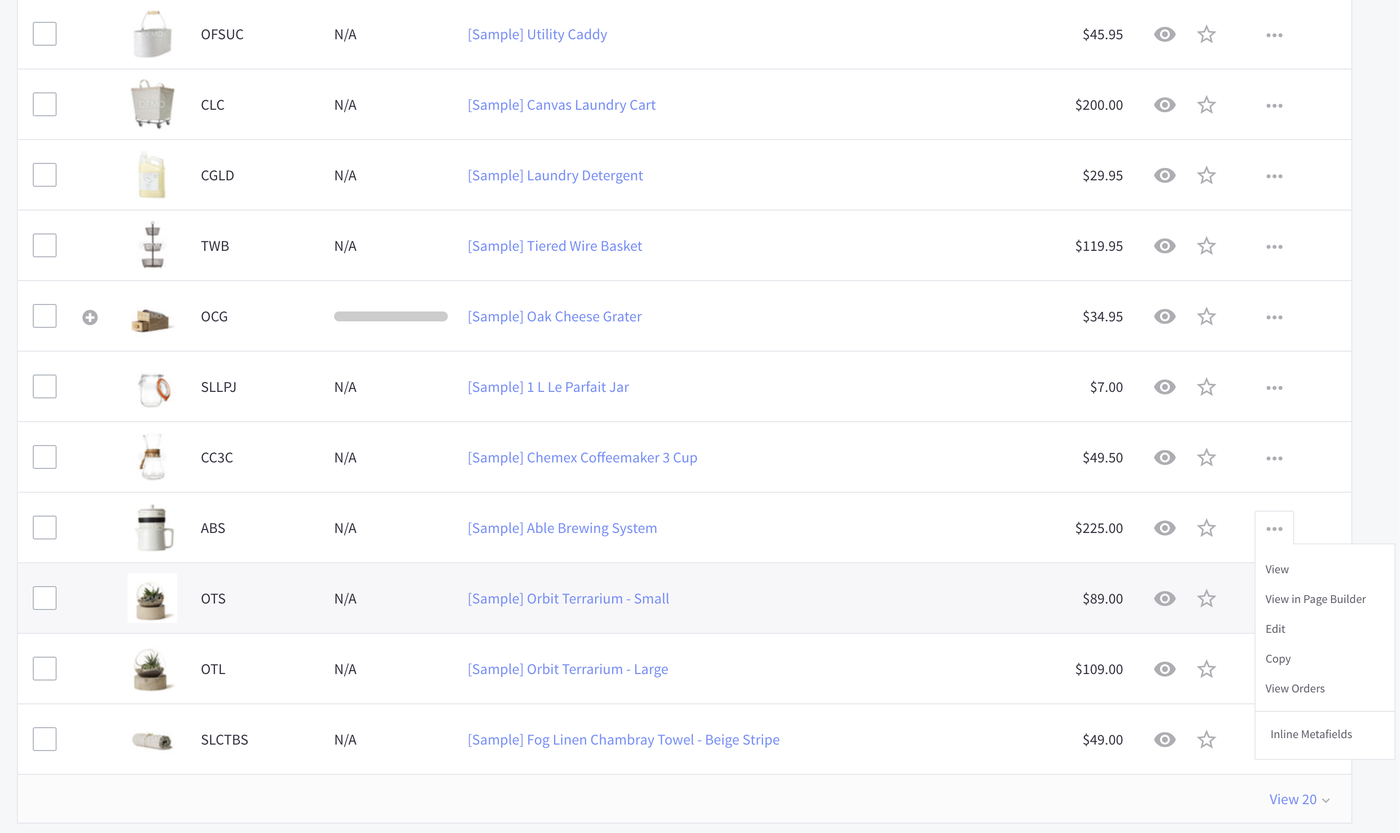
From the product list.
- Go to Products → View.
- On the product’s row, open the Action menu (···) and choose Inline Metafields.
- The editor opens in a panel over the list, so you don’t lose your place.
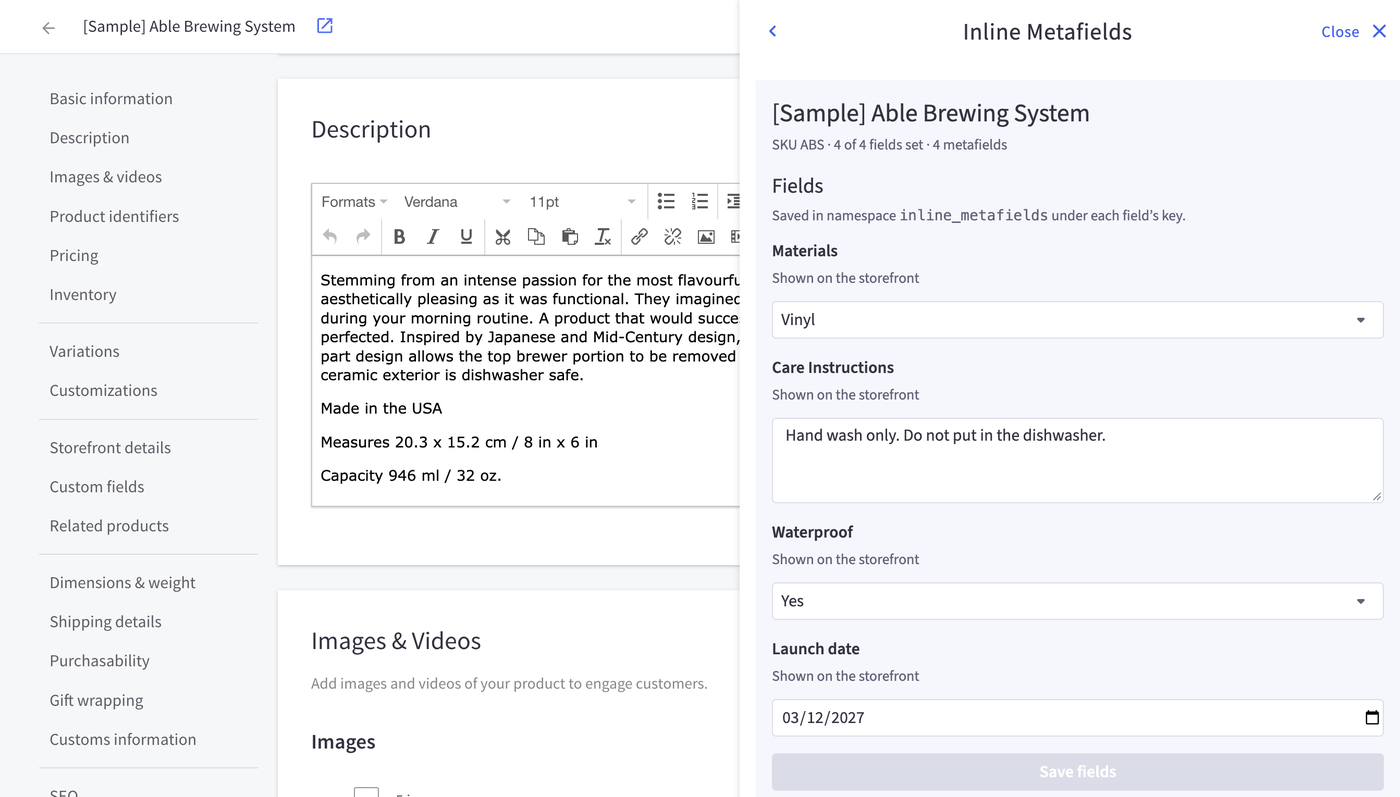
While you’re editing a product.
- Open the product from Products → View.
- In the Description section, open the Action menu and choose Inline Metafields.
- The editor opens in a panel over the product page. Close it to carry on editing the product.
On a new product, save the product first. Fields are saved on a product, so there is nothing to attach them to until it exists.
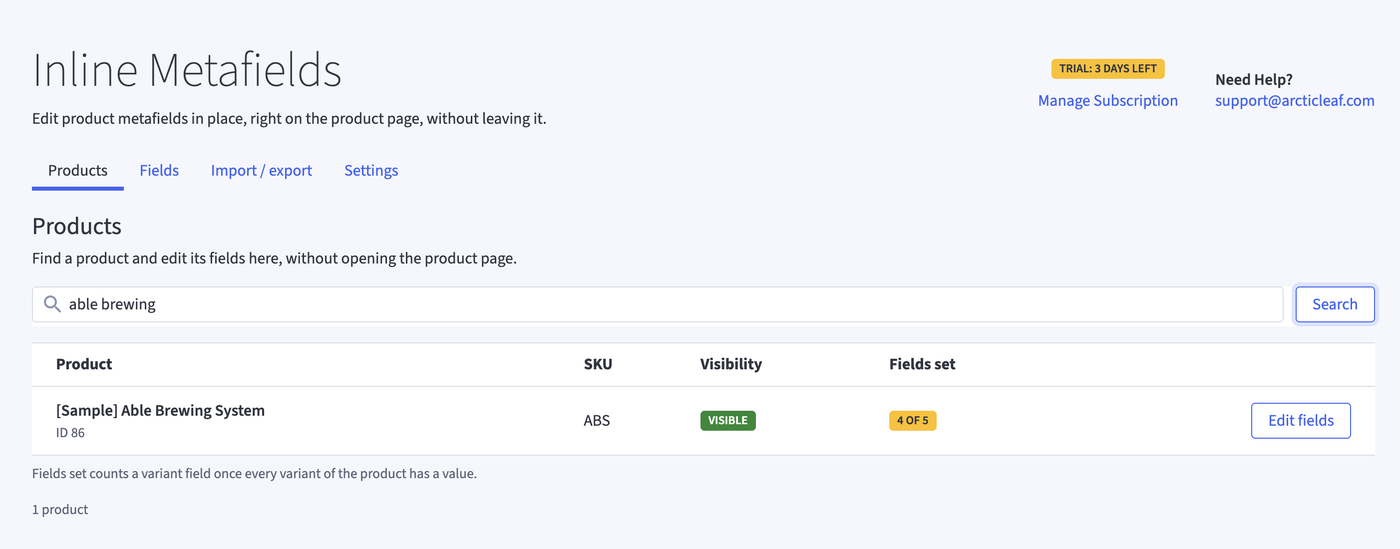
From the app.
- Open Inline Metafields from Apps → My Apps and choose the Products tab.
- Search by name, SKU or brand, and click Edit fields on a product.
- Click ← All products to go back to your search.
In the editor:
- Your fields are listed first, under Fields. For Materials, pick Leather from the list, then click Save fields. You can change several fields and save them together.
- To remove a value, set the field back to Not set (or empty a text field) and click Save fields.
- If a saved value no longer fits the field, for example after you removed an option, you’ll see Saved value doesn’t match this field. The value stays as it is until you choose a new one or click Clear saved value.
- For a media link, paste a link: BigCommerce doesn’t let apps upload files, so Inline Metafields can’t take one directly. For an image, copy its link from BigCommerce’s Image Manager; for a PDF or other file, upload it to your store with WebDAV and copy its link; for a video, use the YouTube or Vimeo page link, or a link to an .mp4 or .webm file. Images show a preview, videos play in the editor, and files show as a named link. Links must start with
https://. - For a product reference, search for a product by name, SKU or brand and click Choose (or Add, for a field that takes several). Use the arrows to change the order, and Remove to take one out.
- For rich text, use the toolbar for bold, italic, lists and links. Text pasted from another site or a document keeps only that formatting.
- Variant fields are listed after your product fields, one block per variant, such as “Size: L, Color: Red”. Click Edit on a variant, fill in its fields and click Save variant. Each block shows how many of its fields are set. On the Products tab, a variant field counts towards Fields set once every variant of the product has a value.
- Custom metafields holds one-off values that don’t need a field of their own. Click Show to see them, and Add metafield to add one with any key and value.
- Other metafields lists metafields added by your other apps and integrations. They are shown so you can see them, but can’t be changed here, so those apps keep working.
Update many products with a CSV file
To fill in or change fields on many products, export them to a CSV file, edit it in a spreadsheet, and import it back. Open the app and choose the Import / export tab.
Export. Click Export CSV. The file has one row per product and these columns:
product_id,skuandname: which product the row is. Leave these as they are.- One column per field, named by its key, such as
materials. _problems: any field whose saved value no longer fits its rules. It’s for your information and is ignored when you import.
Edit. Change the cells you want to change. When you import:
- An empty cell leaves the value as it is. You can delete the columns and rows you aren’t changing.
- To remove a value, type
[clear]in the cell. - A dropdown cell must be one of its options, such as
Leather. Capitals don’t matter. - For a multi-select, separate the choices with a vertical bar:
Leather|Vinyl. - For yes / no, use
yesorno(true,false,1and0also work). - Write dates as year-month-day:
2026-11-01. Write numbers without a thousands separator:1200, not1,200. - For a link or media link, use the full link starting with
https://. For a color, use hex:#1A2B3C. For a product reference, use product ids separated by a vertical bar:123|456. Rich text can be plain text or HTML; only bold, italic, lists and links are kept. - To add rows for other products, fill in
product_id, or justsku(the product’s own SKU, not a variant’s).
Variant fields. If you have fields that apply to variants, the file also has variant_id and variant_sku columns, and each product’s row is followed by one row per variant, named like “Sample Tee — Size: S, Color: Red”. Fill in variant fields on the variant rows and product fields on the product rows. A variant row is matched by variant_sku (or variant_id for a variant with no SKU); leave its sku cell empty. To add a row for a variant, give it its variant_sku.
Save the file as CSV (UTF-8). Some spreadsheet apps change dates and long numbers when they open a CSV; the dry run below will show it if that happens.
Check, then import.
- Click Choose CSV file, select your file, and click Check file.
- This is a dry run: nothing is changed yet. You’ll see how many rows will change, a Changes table with each value now and after import, and an Errors table listing any cell that can’t be imported and why.
- Fix any errors in the file and check it again, or carry on: a row with an error is skipped completely, and every other row is imported.
- Click Import (the button says how many rows will change). When it finishes you’ll see how many rows were imported and which, if any, were skipped.
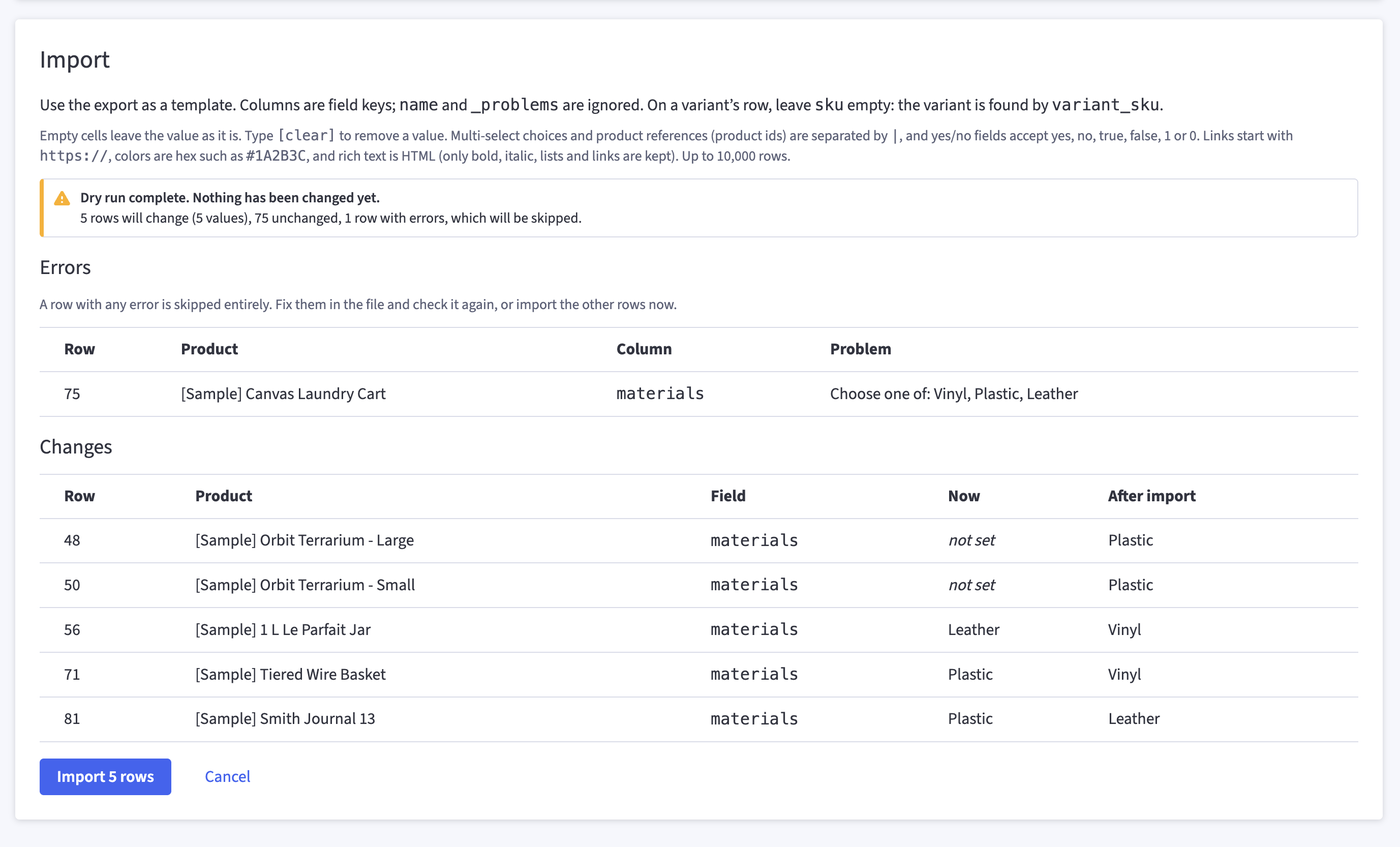
A file can have up to 10,000 rows and be up to 5 MB. Larger catalogs can be split across several files. You can stop a check or an import part way; rows already imported stay imported, and exporting again shows where things stand.
Showing your fields on the storefront
Inline Metafields saves your values on your products. On a Stencil theme (Cornerstone and themes based on it) you can show them with no theme code at all, using two widgets the app adds to Page Builder. A field only ever appears if it has Show on storefront turned on (the default); a private field is never sent to your storefront.
With Page Builder widgets (no theme code)
- Go to Storefront → Themes and click Customize to open Page Builder.
- Use the page menu at the top to open a product page, or browse to a product in the preview.
- Under Widgets, scroll to Custom and drag Product Fields into an area on the product page, such as below the price or below the description.
- Click the widget to choose which fields it shows, a heading, the layout and the colors. Match the product details looks like the theme’s own SKU and weight rows.
- Click Publish.
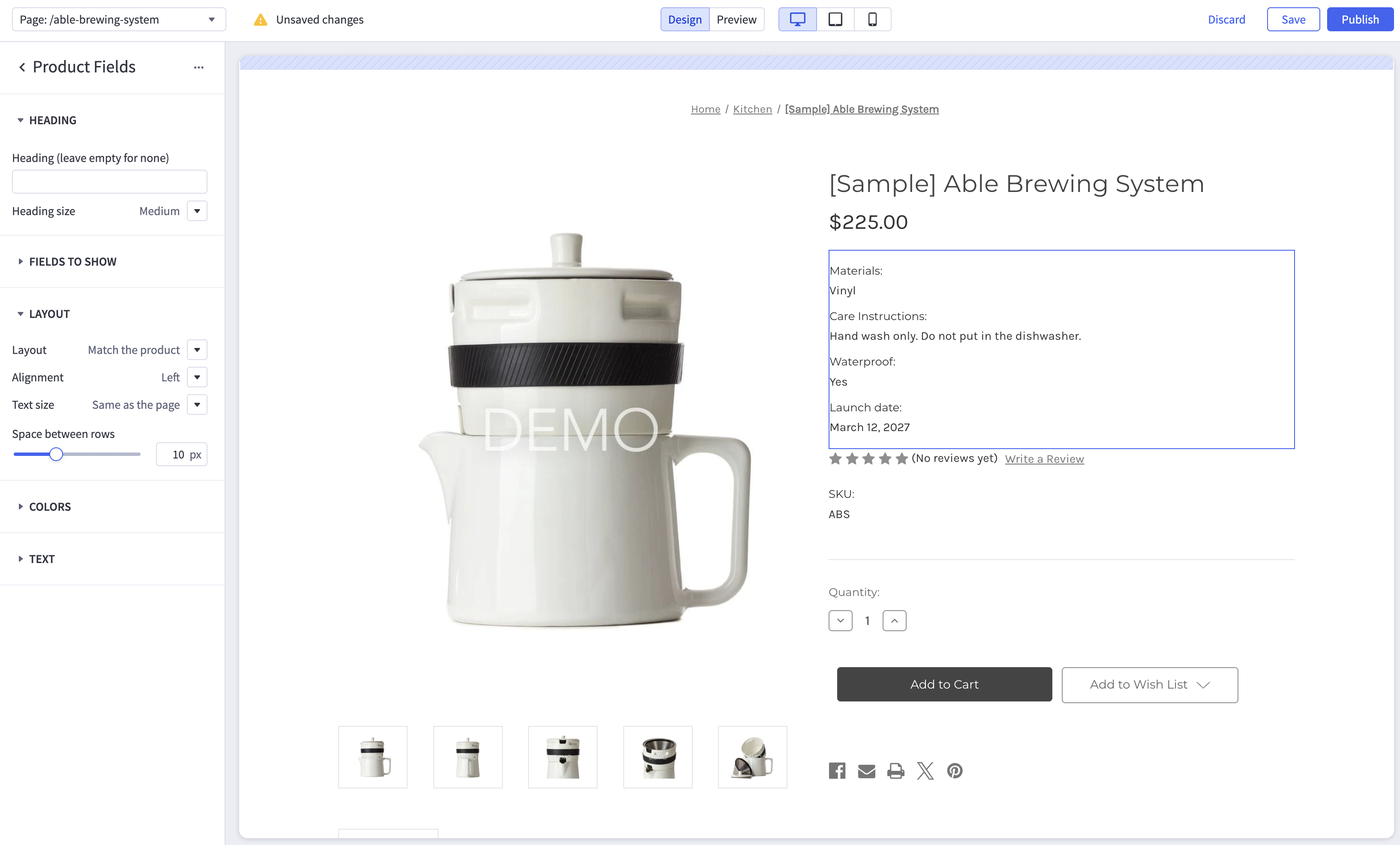
The widget appears on every product page and shows only the fields that product has a value for. Fields that vary by option (size, color and so on) change to the shopper’s choice as they pick it. Fields you add later are shown too, unless you untick them in the widget.
Variant Table. Drag Variant Table onto the product page for a table with a row for each variant: its options, its variant fields, its price, whether it’s in stock, and an Add to cart button. Shoppers can compare every size or color at once and add the one they want. The variant they’ve picked is highlighted. Products with only one variant don’t show the table.
Widgets work on Stencil themes only. On Catalyst or another headless storefront, use the GraphQL query further down.
Removing the widgets. To take both widgets off your storefront, open the app’s Settings tab and click Remove storefront widgets. Every Product Fields and Variant Table widget comes off your pages, and both leave Page Builder until you click Turn on storefront widgets. Your fields and values aren’t affected. Turning the widgets back on doesn’t restore the ones you had placed, so place them again in Page Builder.
Prefer it built into your theme? A developer can add the fields to the theme files instead, once per theme. After that, every product with a value shows it.
We’ll set it up for free. Arctic Leaf will add your fields to your theme, or place the widgets for you, at no charge:
- Email support@arcticleaf.com with your store address and the fields you want shown.
- Add team@arcticleaf.com as a user on your store: go to Account Settings → Users, click Create a User Account, enter team@arcticleaf.com, and choose the Store Administrator role.
- We’ll reply when your fields are showing. You can remove the user afterwards.
The rest of this section is for whoever edits your theme. Every value is a product metafield in the namespace inline_metafields, under the field’s Key from the Fields tab, with the field’s Label as its description.
In your theme's code (Stencil)
This shows every field marked Show on storefront as a Label: value row under the SKU and weight. Fields you add later appear on their own, with no further theme changes. You can paste it in from the control panel: go to Storefront → Themes, open your theme’s Advanced menu and choose Edit Theme Files. A theme from the Theme Marketplace has to be copied before you can edit it.
1. Ask for the fields. Open templates/pages/product.html. The file starts with a block between two --- lines. Paste this just above the second ---, starting at the left edge like the product:line. Use spaces, not tabs, and keep the backslashes.
gql: "query InlineMetafields($productId: Int!) {
    site {
      product(entityId: $productId) {
        metafields(namespace: \"inline_metafields\", first: 50) {
          edges {
            node {
              key
              value
              description
            }
          }
        }
      }
    }
  }"
If the block already has a gql: line, don’t add a second one: add the metafields(…) { … } part inside the existing query’s product(entityId: $productId) { … }.
2. Show them. Open templates/components/products/product-view.html and find the line {{#if settings.bulk_discount_enabled}}. Paste this on a new line just above it, inside <dl class="productView-info">:
{{!-- Inline Metafields: every field marked Show on storefront --}}
{{#each gql.data.site.product.metafields.edges}}
    <dt class="productView-info-name">{{#if node.description}}{{node.description}}{{else}}{{capitalize (strReplace node.key "_" " ")}}{{/if}}:</dt>
    <dd class="productView-info-value">{{#if (isArray (JSONparseSafe node.value))}}{{#each (JSONparseSafe node.value)}}{{this}}{{#unless @last}}, {{/unless}}{{/each}}{{else if node.value '===' 'true'}}Yes{{else if node.value '===' 'false'}}No{{else}}{{nl2br node.value}}{{/if}}</dd>
{{/each}}
Save both files and open a product that has a value. Each row’s label is the field’s Label; for a custom metafield it’s the description, or the key with underscores as spaces when there is no description. Multi-select values are listed with commas, yes/no fields show Yes or No, and dates show as 2026-10-08. Rows appear in the order BigCommerce returns them, usually the order the values were first saved.
Advanced: one block per field. To choose your own labels and order, show only some fields, or format dates, use a block per key instead of the code in step 2. This example uses the keys materials, features, dishwasher_safe, launch_date and care_notes; use your own.
{{#each gql.data.site.product.metafields.edges}}
    {{!-- Dropdown, single-line text or number --}}
    {{#if node.key '===' 'materials'}}
        <dt class="productView-info-name">Materials:</dt>
        <dd class="productView-info-value">{{node.value}}</dd>
    {{/if}}

    {{!-- Multi-select: a list, shown comma-separated --}}
    {{#if node.key '===' 'features'}}
        <dt class="productView-info-name">Features:</dt>
        <dd class="productView-info-value">
            {{#JSONparseSafe node.value}}
                {{#each this}}{{this}}{{#unless @last}}, {{/unless}}{{/each}}
            {{else}}
                {{node.value}}
            {{/JSONparseSafe}}
        </dd>
    {{/if}}

    {{!-- Yes / no --}}
    {{#if node.key '===' 'dishwasher_safe'}}
        <dt class="productView-info-name">Dishwasher safe:</dt>
        <dd class="productView-info-value">{{#if node.value '===' 'true'}}Yes{{else}}No{{/if}}</dd>
    {{/if}}

    {{!-- Date --}}
    {{#if node.key '===' 'launch_date'}}
        <dt class="productView-info-name">Available from:</dt>
        <dd class="productView-info-value">{{moment node.value "MMMM D, YYYY"}}</dd>
    {{/if}}

    {{!-- Multi-line text, keeping line breaks --}}
    {{#if node.key '===' 'care_notes'}}
        <dt class="productView-info-name">Care:</dt>
        <dd class="productView-info-value">{{nl2br node.value}}</dd>
    {{/if}}
{{/each}}
Use double braces ({{node.value}}), not triple: values are text your staff typed, and double braces make sure they display as text.
Catalyst and other headless storefronts
Query the GraphQL Storefront API. In Catalyst, add this next to the product page’s other queries in core/app/[locale]/(default)/product/[slug]/page-data.ts and fetch it with the Catalyst client. To ask for specific fields, add keys: ["materials"] next to namespace.
query InlineMetafields($entityId: Int!) {
  site {
    product(entityId: $entityId) {
      metafields(namespace: "inline_metafields", first: 50) {
        edges {
          node {
            key
            value
          }
        }
      }
    }
  }
}
Up to 50 fields come back per request, as a list of key and value pairs. Fields with no value on the product aren’t in the list.
How each type of field is stored
Every value comes back as text, in these forms:
| Type | Stored as | To display it |
|---|---|---|
| Text, dropdown | As entered, such as Leather | Show it as is. For multi-line text, keep the line breaks |
| Multi-select | A list in the field’s option order: ["Leather","Vinyl"] | Read it as a list and join the items |
| Yes / no | true or false | Show Yes or No. A field left “Not set” isn’t sent at all |
| Date | 2026-10-08 (year, month, day) | Format it for your shoppers. It’s a calendar date with no time or time zone |
| Number | 12.5, with a dot for decimals and no thousands separator | Show it as is, or format it; add any units yourself |
| Link, media link | The link, starting with https:// | Link to it, or show the image or video it points to |
| Color | #1A2B3C | Use it as a color, such as a swatch |
| Rich text | HTML with only bold, italic, lists and links | Show it as HTML, not as text |
| Product reference | A list of product ids: [123,456] | Look the products up and show them |
Variant fields are saved on each variant rather than on the product, so your theme reads them from the product’s variants.
If you change a field after values were saved, for example by removing a dropdown option, products keep their old value until someone changes it, so it can still appear on the storefront.
Billing and your subscription
Inline Metafields is USD 9.99/month after a 7-day free trial, billed through Stripe. There is one plan, and every feature is included.
While you are on a trial the header shows how many days remain. Click Manage Subscription to open the Stripe customer portal, where you can update your card, view invoices, or cancel.
Cancelling takes effect at the end of the period you have already paid for — you keep access until then, and the header changes to show when it ends. You can resubscribe at any time.
Prices shown are exclusive of sales tax, which is calculated at checkout based on your billing location.
Uninstall
- Open Inline Metafields, go to the Settings tab and click Remove storefront widgets. This takes the Product Fields and Variant Table widgets off your storefront pages and out of Page Builder.
- In your control panel go to Apps → My Apps.
- Find Inline Metafields and choose Uninstall.
Do the first step before you uninstall. BigCommerce ends the app’s access to your store as soon as you uninstall, so after that the app can’t remove the widgets for you. If you skip it, any widget left on a page stops showing within 30 days, and you can delete it in Page Builder.
Uninstalling removes the app’s access to your store, and the Inline Metafields items disappear from your product menus. We delete your store’s access details, your user record and your billing record.
We keep your field definitions: each field’s name, type, rules and options. They contain no customer data, and they’re stored with us, not in your store. If you reinstall, your fields are there as you left them. To remove them for good, delete them on the Fields tab before you uninstall, or email us and we’ll delete them for you.
The values you entered, for products and for variants, are saved in BigCommerce, not in the app, so they stay on your products after you uninstall and are there again if you reinstall. To remove them, clear them before you uninstall: export a CSV, put [clear] in each field’s column and import it.
Uninstalling does not cancel your subscription. Cancel it from Manage Subscription before you uninstall, or contact us and we’ll take care of it.
Troubleshooting
- “Your session has expired”
- Sessions last 24 hours. Reopen the app from Apps → My Apps — refreshing the page will not work, because the expired session is part of the page address.
- “This app can only be used within the context of a BigCommerce store”
- The app was opened outside your control panel, usually from a bookmarked address. Open it from Apps → My Apps instead.
- The widgets aren’t in Page Builder, or a widget shows nothing
- Open Inline Metafields from Apps → My Apps once; that adds or repairs the widgets. If you removed them, turn them back on from the Settings tab. A widget only shows on a product page, only shows fields with Show on storefront on, and only shows a field when the product has a value for it. Fields that vary by option appear once the shopper has picked every option. The variant comparison needs at least two variants.
- Nothing happens when I click
- Try a different browser. Inline Metafields supports current versions of Chrome, Firefox, Safari, and Edge. If it persists, email us with your store address and what you clicked.
Get help
Email support@arcticleaf.com. Including your store address and what you were doing helps us answer faster.